
Trapping mistakes can result in missed catches, pullouts, and the capture of non-targeted animals. But by far, the worst mistakes are the ones that have you pulling sets, correcting problems, and reburying your traps.
3 trapping mistakes that will ruin your whole trapline
It took me four days to set my first trapline. As soon as I was finished taking the trapping course and received my license, I was out the door. I had already purchased all my equipment and scouted the land for perfect locations.
I carefully approached each potential new spot and began digging. I put in 52 foothold sets over the next 96 hours. I checked my line the following day, found nothing, and headed to my day job.
At work, I bragged to my trapping mentor/co-worker about all the hard work I had done. Then, I dived into the details, speechified about the potential value of the furs I would take, and wondered why more people did not earn a living trapping.
My mentor studied me for a second and asked a question I still hear echoing through my nightmares.
“What did you set your pan tension at?”
The most common of mistakes? Forgetting to set pan tension
Pan tension mistakes only go one of two ways, too little or too much. Too little tension, and the trap fires when a mouse walks across it. Too much, and a moose couldn’t set the thing off.
I’ll be honest here, a moment of “screw it” washed over me. If my pan tensions were too light, I could live with it. However, better judgment eventually won me over, and I dug up the closet trap and checked. The tension was way too high. My traps would never fire when a coyote or a fox stepped on them.
It took me two days to dig up all my traps, set the pan tensions for two pounds, and rebury everything. Of course, we could debate for weeks about the two pounds, but it worked for me.
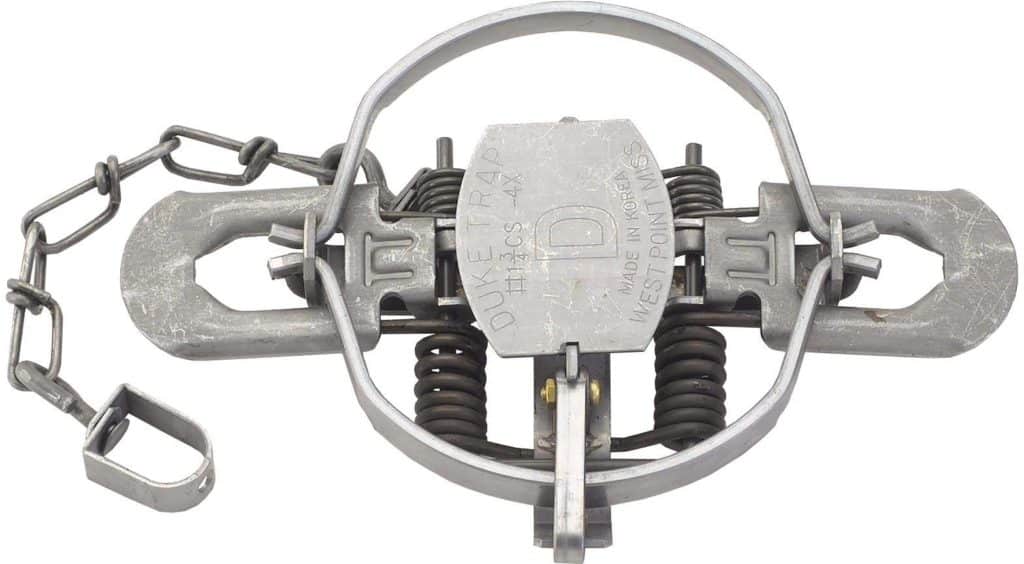
In the photo above, I draw your attention to brass pan tension screw. I missed its importance and suggest you not make the same mistake.
Please note: I may receive a small commission (at no extra charge to you) if you use one of the links I provide..
Duke traps, however, does not pay me to recommend them—and I strongly urge you to buy directly from them. You can see their whole catalog here: https://www.duketraps.com/.
Trapping earth anchor selection and size.
I celebrated Christmas (for trappers, any day there is fur in a set is Christmas Day) in early November that year. Wow! What a rush! Of course, the first time I saw a big eastern coyote in one of my sets, I was sure I had caught someone’s dog.
Nonetheless, this proof of my skills boosted my confidence, and I snapped a few pictures and dispatched the dog. Yep, I went to work with it proudly laying in the bed of my truck.
Two days later, while walking my trap line, I heard some jangling metal sounds coming from somewhere a few yards off my path. Investigating, I found a female coyote with a trap on her front leg, and the traps’ anchor twisted and snagged on some fallen branches. She had pulled the trap, anchor and all, out of the ground.
I snapped pictures of the hole she left behind and showed them to my mentor. He studied them for a moment and said, you are using the wrong length of earth anchors.
Using the wrong earth anchor size or type when trapping.
It turned out that my land had a deep cover of vegetative matter in many spots. As a result, the 15-inch anchors I used were not long enough. To make matters worse, I got lazy with this crucial step. I stopped pounding them when I hit rocks and left way too much slack above ground.
As a result, many of my earth anchors never got deep enough to reach the earth.
Correcting this problem required the uncovering and testing of every one of my 52 sets. First, in for a penny, in for a pound, I swapped every earth anchor out for a longer 18 inch one. Then, I carefully reset and covered all my sets, giving each the required test yank to set the anchor.
These 18” wolf Fang anchors hold in all types of soil. This is the product I switched too. Make sure you purchase their anchor drives and quick links, too.
Failure to freeze-proof your traps.
By the middle of my 1st November trapping, I had caught a handful of critters and figured I had mastered the art of setting traps. Then, it was time to move on to skinning and tanning. Little did I know what the weather had in store for me.
We had a prolonged, soaking rain on Friday afternoon that lasted all night. By dawn, the temperature had dropped into the teens. I was halfway down my trap line before I noticed something was wrong. One of my traps was covered under frozen dirt. Poking around with a stick, I could tell the trap would not fire with this icy cap over it.
Not wanting to admit to another failure, and without seeking anyone’s guidance, I sprinkled the top of the trap with calcium chloride. This worked for a while. But, unfortunately, I didn’t realize the difference between defrosting and freezeproofing right away.
Every rain or snowfall left moisture to soak down, around, and into the trap bed. Then, as the temperatures fell and early winter approached, all my traps were soon embedded in a tomb of ice.
Beware the three killer trapping mistakes!
Excitement and laziness, the two worst trapping mistakes.
The mere idea of trapping brings something primitive and exciting to the mind. No other hunter ever learns more about their prey than a trapper. Giddy, sometimes nearly mad, we scour the ground searching for signs of coyotes and foxes. Our eyes pick out trails, natural crossing points, and obvious (to us) future urine posts.
Our hands are office-worker smooth the day we buy our first leg holds. Our jeans have clean, unstained knees. Our winter lives are spent warm, dry, and indoors.
All that will soon change, once we start trapping. And it heartens us. Now we will live like real humans. We will be outdoors, braving the elements and mastering the animal kingdom. But, unfortunately, only a few of the smartest of us think even spraying fluorescent pink paint on our tools.
Then laziness rears its ugly head right about at the sixth or seventh dirt hole. First, we packed our trapping bag with everything we could need in our excitement. Then we added all of our traps. Why are make two trips, right?
Who cares if the trap wiggles a bit and doesn’t sit flat? So what if they’re a few more inches of anchor line above ground than should be? Let’s get this baby covered with dirt and move to the next hole. Laziness, thy name is quantity.
How to avoid trapline ruining trapping mistakes.
- Before making your first scrape in the earth, learn everything about your tools. Missing a few brass screws that set the pan tension was evidence I hadn’t realized how traps functioned.
- You have to know the rules before you can break them. The earth anchors came with directions. The directions told me how far they needed the be buried and how to test they were correctly set. I hit a few unseen rocks a few too many times and grew frustrated. Soon, I was half-heartedly pounding stakes and stopping at the first sign of resistance. I figured no animal could be strong enough to pull them out again.
- Freezeproof every set. Winter is coming. Hell, trappers want the shorter days, the colder temps, and the prime furs of the approaching season. Yet how many of us find our traps frozen and useless by December? How many groan at the idea of making wax dirt?
Preventing traps from freezing.
After trying buckwheat hulls (that blow away) and various antifreeze powders and other methods, I switched solely to crumpled waxed paper.
The temperatures and rainfall in November often produced frozen traps where I trapped. To keep a trap firing for as long as possible, I needed to:
- Keep the cover over the trap from forming a solid cap.
- Keep the trap springs, jaws, and pan moisture-free.
- Keep the trap from contacting the ground it is bedded upon.
How to wax paper a trap for coyotes, fox, and bobcats.
The crumpled wax paper did all three of these things. Crumpling the paper into a tight ball and then smoothing it out for use eliminated any sound the paper might make.
After you have smoothed it out:
Bed your trap on a single sheet of waxed paper. This prevents any part of the trap from coming into direct contact with the ground.
Then wrap the jaws in two separate sheets (one sheet for each jaw) and fold the entire trap in another sheet. With the trap snugly tugged into the waxed paper (and the trap pan covered), set an on the groundsheet and anchor the trap through it.
Finally, use as little dirt as possible to cover the trap. Here the crumpled waxed paper helps again by holding the cover material in place and allowing you to use less than a half-inch of material.
When snow is already on the ground, the waxed paper is all the top cover I have ever needed. I brush snow over the set and move on to the next location.
Trapping protects livestock and deer.
And saves taxpayers money—ask anyone who lives where beaver trapping is prohibited or over regulated.
A lot rides on your success. As a farm owner, I hope you celebrate Christmas everyday on your trapline!